It has been busy here but I finally finished the next set of cards... more wedding cards! While I was in the craft room I have been taking lots of photos as quite a few people have asked questions about how to make the "gap" in the embossing... so pictures I think are a little less confusing... I hope this helps :-)
 The six wedding cards I finally finished today with the help of my Cuttlebug and Silhouette Cameo... for details please visit my previous post "Wedding Card".
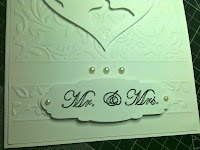 This post will hopefully clear up the method of the "gap"... so here we go...

 Start with the front panel that you would like embossed. Be sure your card is good quality as if it is too thin you will break through while embossing. I know I am stating the obvious but the whole idea of this blog is to pass on knowledge I have learned from some very crafty people on and off line ;-)


Pop your card in the embossing folder lining it up with the top/side of your folder as you want it to be embossed. The sandwich here is A plate, B plate, embossing folder and card, B plate. NOTE the position of the B plate, I sit it behind the edge of the embossing folder or you get a line where the edge of your embossing folder is on your cardstock.
 This gives you the larger section embossed... then to get the strip of embossing I use a strip of self healing mat. I use double sided tape to stick it to the folder so that it does not move while embossing. You can use a strip or any other shape but it will not show detailed shapes well so keep it simple :-) You can even make diagonal lines if that is what you need!
If you like you can do a whole folder with strips and gaps all the way down...


Cuttlebug Sandwich is A plate, B plate embossing folder with cardstock lined up as needed, self healing mat.
NOTE there is NO second B plate! As always you do this at your own risk, it works in my machine, I have heard it works in other peoples machines but if you do this YOU choose to do this. ;-)
 Turn the cardstock over so that you are on the debossed side. Line up the edges of the embossing with a line on an embossing board and use the embossing tool to make the lines needed.
Turn the cardstock back over and see if there is any embossing "over the line", if there is just use your embossing tool to gently push it back into place...


 There you have it!
I hope this clears up how to get the embossed strips... happy crafting...
Sarah *hugs*

 This post will hopefully clear up the method of the "gap"... so here we go...
 Start with the front panel that you would like embossed. Be sure your card is good quality as if it is too thin you will break through while embossing. I know I am stating the obvious but the whole idea of this blog is to pass on knowledge I have learned from some very crafty people on and off line ;-)


Pop your card in the embossing folder lining it up with the top/side of your folder as you want it to be embossed. The sandwich here is A plate, B plate, embossing folder and card, B plate. NOTE the position of the B plate, I sit it behind the edge of the embossing folder or you get a line where the edge of your embossing folder is on your cardstock.

If you like you can do a whole folder with strips and gaps all the way down...


Cuttlebug Sandwich is A plate, B plate embossing folder with cardstock lined up as needed, self healing mat.
NOTE there is NO second B plate! As always you do this at your own risk, it works in my machine, I have heard it works in other peoples machines but if you do this YOU choose to do this. ;-)

This gives an embossed strip which you might be happy with but I like to finish it with embossed lines.

Turn the cardstock back over and see if there is any embossing "over the line", if there is just use your embossing tool to gently push it back into place...


 There you have it!
I hope this clears up how to get the embossed strips... happy crafting...
Sarah *hugs*


