G'day,
 Well I liked the first triple layer card so much I made another one... this time though the colours were Grape Jelly, LuLu Lavender, Sweet plum, Lilac Posies and Angel Pink Mementos Dye ink. I was a little apprehensive on such an array of shades but I think it worked :-)
I used my Cameo Silhouette files I used for the last one to do the cutting out... still way more straight and accurate than I will ever get free hand! I would like to know how everyone else attaches bows to their cards? In this case I used wet glue as the silicon dots don't seem to cut it and neither does the double sided tape.
For this card it only takes 2 A4 sheets of card, one black one white.
The black sheet has the card base A6 size (21cm by 14.5cm) then rectangles of (8cm by 12cm) and (9.5cm by 5.5cm) cut out.
The white A4 sheet has two rectangles of (14cm by 10cm), a (11.5cm by 7.5cm) rectangle and a (9cm by 5cm) rectangle cut out. One of the 14cm by 10cm rectangles gets decorated and put inside the card to be written on.
 Mount the other 3 with a very, very little amount of double sided on 2 corners each just so that they do not move when you are stamping.
 When you stamp you will get a bit of a gap in your stamping where your card moves to the next level but this gets covered by the black card. I do stamp with a piece of foam underneath to give me some give and I get a much better image.
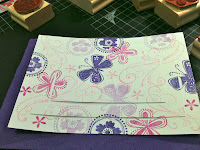
 Continue stamping with your images - in my case Stampin' Up! "Priceless" - until you are satisfied. I have placed the just stamped one next to the previously made and mounted card to show the difference the contrasting card bases make.
Then the tricky part is mounting it all evenly... I use double sided tape to put my cards together and make sure I don't push to stick down until I am certain it is even. Don't forget to put your ribbon in before you stick down whichever layer you want it in!

Happy Crafting!
Sarah x
 Well I liked the first triple layer card so much I made another one... this time though the colours were Grape Jelly, LuLu Lavender, Sweet plum, Lilac Posies and Angel Pink Mementos Dye ink. I was a little apprehensive on such an array of shades but I think it worked :-)
I used my Cameo Silhouette files I used for the last one to do the cutting out... still way more straight and accurate than I will ever get free hand! I would like to know how everyone else attaches bows to their cards? In this case I used wet glue as the silicon dots don't seem to cut it and neither does the double sided tape.
For this card it only takes 2 A4 sheets of card, one black one white.
The black sheet has the card base A6 size (21cm by 14.5cm) then rectangles of (8cm by 12cm) and (9.5cm by 5.5cm) cut out.
The white A4 sheet has two rectangles of (14cm by 10cm), a (11.5cm by 7.5cm) rectangle and a (9cm by 5cm) rectangle cut out. One of the 14cm by 10cm rectangles gets decorated and put inside the card to be written on.
 Mount the other 3 with a very, very little amount of double sided on 2 corners each just so that they do not move when you are stamping.
 When you stamp you will get a bit of a gap in your stamping where your card moves to the next level but this gets covered by the black card. I do stamp with a piece of foam underneath to give me some give and I get a much better image.
 Continue stamping with your images - in my case Stampin' Up! "Priceless" - until you are satisfied. I have placed the just stamped one next to the previously made and mounted card to show the difference the contrasting card bases make.
Then the tricky part is mounting it all evenly... I use double sided tape to put my cards together and make sure I don't push to stick down until I am certain it is even. Don't forget to put your ribbon in before you stick down whichever layer you want it in!

Happy Crafting!
Sarah x


